Warning: Declaration of FEE_Field_Terms::wrap($content, $taxonomy, $before, $sep, $after) should be compatible with FEE_Field_Post::wrap($content, $post_id = 0) in /home/twfs/serverkurabe.com/public_html/blog/wp-content/plugins/front-end-editor/php/fields/post.php on line 0

Warning: Declaration of FEE_Field_Tags::wrap($content, $before, $sep, $after) should be compatible with FEE_Field_Terms::wrap($content, $taxonomy, $before, $sep, $after) in /home/twfs/serverkurabe.com/public_html/blog/wp-content/plugins/front-end-editor/php/fields/post.php on line 0

Warning: Declaration of FEE_Field_Category::wrap($content, $sep, $parents) should be compatible with FEE_Field_Terms::wrap($content, $taxonomy, $before, $sep, $after) in /home/twfs/serverkurabe.com/public_html/blog/wp-content/plugins/front-end-editor/php/fields/post.php on line 0

Warning: Declaration of FEE_Field_Post_Thumbnail::wrap($html, $post_id, $post_thumbnail_id, $size) should be compatible with FEE_Field_Post::wrap($content, $post_id = 0) in /home/twfs/serverkurabe.com/public_html/blog/wp-content/plugins/front-end-editor/php/fields/post.php on line 0

Warning: Declaration of FEE_Field_Post_Meta::wrap($data, $post_id, $key, $ui, $single) should be compatible with FEE_Field_Post::wrap($content, $post_id = 0) in /home/twfs/serverkurabe.com/public_html/blog/wp-content/plugins/front-end-editor/php/fields/post.php on line 0

Warning: Declaration of FEE_Field_Widget::wrap($params) should be compatible with FEE_Field_Base::wrap($content, $data) in /home/twfs/serverkurabe.com/public_html/blog/wp-content/plugins/front-end-editor/php/fields/widget.php on line 0

Warning: Declaration of FEE_Field_Comment::wrap($content) should be compatible with FEE_Field_Base::wrap($content, $data) in /home/twfs/serverkurabe.com/public_html/blog/wp-content/plugins/front-end-editor/php/fields/other.php on line 0

Warning: Declaration of FEE_Field_Term_Field::wrap($content, $term_id, $taxonomy) should be compatible with FEE_Field_Base::wrap($content, $data) in /home/twfs/serverkurabe.com/public_html/blog/wp-content/plugins/front-end-editor/php/fields/other.php on line 0

Warning: Declaration of FEE_Field_Single_Title::wrap($title) should be compatible with FEE_Field_Term_Field::wrap($content, $term_id, $taxonomy) in /home/twfs/serverkurabe.com/public_html/blog/wp-content/plugins/front-end-editor/php/fields/other.php on line 0

Warning: Declaration of FEE_Field_Option::wrap($content, $key, $ui) should be compatible with FEE_Field_Base::wrap($content, $data) in /home/twfs/serverkurabe.com/public_html/blog/wp-content/plugins/front-end-editor/php/fields/other.php on line 0
「さくらのVPS」導入解説 その3:rootのパスワード変更(後編) | Sabakura Blog

「さくらのVPS」導入解説 その3:rootのパスワード変更(後編)

この記事は「さくらのVPS導入解説 その2」の続きです。

前回はroot権限およびSSH接続について説明し、SSHクライアントであるPoderosaをインストールするまでを解説しました。
今回は実際にPoderosaを使ってSSHでVPSに接続し、rootのパスワードを変更します。

Poderosaを使ってVPSに接続

  1. Poderosaを起動し、メニューバー「ファイル」→「新規接続」をクリックすると、「新規接続」ダイアログが表示されます。
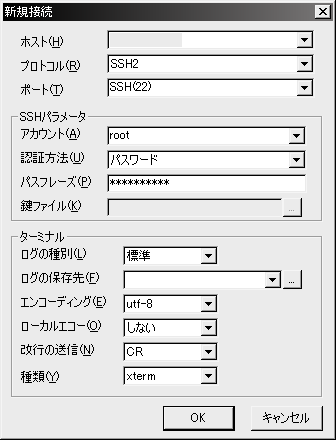
    Podrosa新規接続
  2. 「ホスト」にメールに記載のIPアドレスを入力し、プロトコルが「SSH2」になっていることを確認します。※SSHにはSSH1とSSH2という二種類がありますが、現在では主にSSH2が使われています。
  3. 「アカウント」はまずは「root」、「認証方法」は「パスワード」、「パスフレーズ」にメールに記載のパスワードを入力して、「OK」をクリックします。
  4. 「SSHサーバーの公開鍵はssh_known_hostsに登録されていません。登録して続行しますか?」と確認ダイアログが出るので、「はい」をクリックします。
  5. 接続に成功すれば[root@**** ~]#と表示されます。(****にはホスト名が表示されます)これは****というホストにrootユーザーとして接続しています、という表示です。なお、「#」は現在rootユーザーの状態にある示す記号です。

以上でVPSに接続できました。続けてrootのパスワード変更を行っていきます。
Poderosaの接続は切断せずに、そのまま次の「rootパスワードの変更」に進んでください。

rootのパスワード変更

OSの指定をせずにさくらのVPSを契約した場合、サーバーのOSにはCentOSが選択されています。

用語解説:CentOSとは

Linuxは自由に改変ができるOS(正確にはカーネルと呼ばれるOSの中核部分)であるため、時とともに様々な種類のLinuxが生まれました。これらはLinxuディストリビューションと呼ばれます。やや大味な説明となりますが、WindowsのなかにVistaや7、WindowsServer2008などの様々なOSがあるのと似たようなものだとも言えます。

なかでも「CentOS」は、企業向けのLinuxディストリビューションである「Red Hat Enterprise Linux」をフリーで使える形にしたものです。最近ではサーバーの多くで採用されており、とくに共用サーバーはほとんどCentOSが使われているのが現状です。

CentOSでパスワード変更を行うためには「passwd」というコマンドが用意されています。

用語解説:コマンドとは

Windowsにおいてもコマンドプロンプトを使う際には、コマンドを入力して命令を行います。Linuxでも同様に、GUI以外にコマンドによる命令が行えます。

SSHでサーバーに接続した場合には、GUIによる操作は行えません。よってサーバーの操作・設定はすべてLinuxコマンドを使って行うことになります。
代表例として今回上げた「passwd」コマンドがありますが、Linuxには他にも多くのコマンドがあります。(参考:Linuxコマンド集 – ITpro

rootのパスワード変更手順

  1. 「passwd」と入力し、Enterキーを押します。
  2. 「New UNIX password:」と出て新しいパスワードの入力が求められますので、自分で決めた新しいパスワードを入力します。

    • なお、このとき入力したパスワードは一切画面上には表示されません(*アスタリスクでの表示もないので、慎重に入力してください)
    • あるいは先にパスワードをコピーしておいて、Poderosaのメニューバーの「編集」→「貼り付け」(Alt-V)でもOKです。
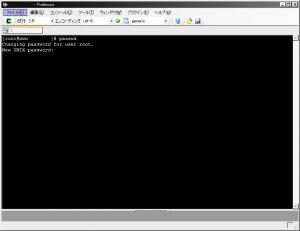
  3. Enterキーを押すと「Retype new UNIX password:」と表示されるので、再度入力(または貼り付け)を行います。

    • もしパスワードの確認入力が間違っていた場合は「Sorry, password do not match.」と表示されるので、再度入力しなおします。
  4. 上手くパスワードの認証が終われば「passwd: all authentication tokens updated successfully.」と表示されます。

以上でrootのパスワード変更は完了です。

コメントを投稿